Thursday, January 27

Family is Love Banner

I had a great time at a friend's home last night making this adorable banner!


Everything is from Close to My Heart!

I've been using Close to My Heart products for YEARS...once upon a time, I made time to scrapbook everything by hand and now they've gone digital with scrapbooking. I was playing around with their Studio J program and it is COOL!

Feel free to check it out for yourself

If you love the banner, contact Sharryl through the link above to order supplies to make your own. I love mine. :)


Wednesday, January 26

New Listings on Etsy

So I got sewing this past weekend and posted some new items in my Etsy shop!


Feel free to click the pictures to link to my shop!

Don't my kids make cute models...although my son was being a total STINKER and my daughter had to be bribed with a fruit snack in order to stand still.

Tuesday, January 18

Getting Back On...

I promise myself I will get back on the crafting horse this month...our family has had a difficult month with my mom being in and out of the hospital.

I will get sit back down at the sewing machine again! I PROMISE!

I WANT this....please :)

This beauty is called a Silhouette machine! You can find out about it HERE...oh my goodness! It is seriously one of the best things to happen since the invention of the sewing machine...and I'm saying that without ever laying my hands on one!

This is going on to the top of my WISH list!! Forget the ipad I've been dreaming about, or even the serger that I've wanted for years...this Silhoutte would CHANGE MY LIFE!

Saturday, January 1

T-Shirt Style Painted Silhouttes

I took the idea I had with painting silhouttes of my children and created a really fun, original Christmas gift for my husband, but really this would make a great birthday/Mother's Day/Father's Day/Grandparents Day/Arbor Day present!

You'll Need:
Pictures of your kids turned into stencils (see my other tutorial)
Freezer Paper
T-shirt (I used a Jerzeez from Target)
T-shirt Paint
Paint brush
Scissors
Iron & Ironing Board

I used the stencils I created and traced them onto the non-shiny side of the freezer paper.
I highly recommend cutting the paper to equal sizes like 4x6, it will help in lining up the silhouttes on the t-shirt.
I then cut out the faces of my children, starting by making a hole in the center and cutting out. My little Fiskar scissors are the best at detail cutting.

Then, iron the shiny side DOWN. Be careful to line up the pictures. Mine aren't lined up and are off a little, no one else notices but me...so its fine...except for OCD me. :)
Then put a strip of freezer paper between the front and back of the shirt on the inside, with the shiny side towards your ironed on stencils.

Time to paint! I bought the velveteen paint at Michaels and liked how it turned out, its not too stiff when it dries.
I was cautious and outlined the edge of the stencil first, but this was not needed, so just paint away!

Fill in the entire stencil. I did three coats to get it black enough.
Once completed...the hardest thing to do is wait for the paint to dry!

Once its dried, carefully peel off the freezer paper, you made need tweezers to get you started or for small areas.
Here's my husband in his new shirt. He doesn't have a designated office space at his job, but can dress casual on Fridays and he's loved wearing his shirt to work.

Tuesday, December 14

Painted Silhoutte Project

WARNING: This is a great LAST MINUTE Christmas gift craft...and very fun...and addicting...ok, you're good to read on...

I have been busy recovering from my boutique last weekend...so this week its back to making handmade lovlies for Christmas. I have always had a hard time figuring out what to get my mom and my inlaws. This year I've been having this obsession with silhouttes...we went to Disneyland in May and I wanted to have them done there, but just couldn't bring myself to pay for them.

I knew then thats what I wanted to make my family for Christmas. I don't have great skill with scissors, so I decided to go a different route. I made stencils out of pictures and then painted the silhouttes onto cardstock!


Here's what you'll need:

Camera
Printer
White Cardstock
Black Paint
Paint brushes, a few different sizes
These wooden plaques from JoAnn's
Modge Podge, I used matte finish
Scissors (I love my Fiskars for cutting the details)
Sandpaper
Grossgrain ribbon
Ruler
Pencil
First thing I did was take profile shots of all my kids. I had my husband hold the baby...this works best in front of a bright window during the brightest part of the day.
These are the unedited images...

I used Photoshop to darken the shadows and increase the contrast, I also increased the levels, do whatever works to get the best shadow to cutout. Print this onto cardstock, make sure it will fit into the size of plaque you use. My plaque was 5X7.
Next, cut out your child's face. I used a pencil to draw around where I wanted to cut, especially important to make the bottom look kinda fancy. Its fun to cut out the hair, to give the silhoutte your childs personality.
Tape the side where you cut into the cardstock at, this is now your stencil!

First, tape your stencil onto a clean sheet of cardstock.
Now its time to PAINT! I took a small detail brush, keep it dry...and paint the outline carefully. Then take a larger brush and fill it in. You can use the detail brush to go back and clean it up.
My sister did one technique that worked for her, I used another. You might make a few mistakes, so be patient and find what works best for you.

I did take the small brush and added eyelashes to my daughter and some more flyaway hair.
Ok, so take your plaques and paint them black on one side and paint up the edge on the other (I didn't get a picture of this step). Leave the part where you will mount your silhoutte clean of paint.
Trace the plaque around your silhoutte and trace it, cut it out. Use the modge podge to glue your cardstock onto the plaque. Use a thin layer and get all the bubbles out by smothing it down.

Get the sandpaper and use it to sand away the excess cardstock. So the cardstock becomes one with the plaque :) I also sanded some of the black paint off around the edges, gave it a cool shabbt chic look!

Modge podge a thin layer over the top
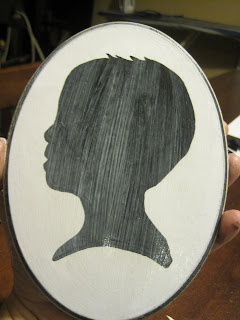

And when the front is dry, do the back!

Cut a 4.5" piece of grossgrain ribbon and glue it onto the back of the plaque, once the modge podge is dry. This is what you'll use to hang your picture, the plaques aren't heavy at all.
I made little bows out of the grossgrain and added them to the front of the silhouttes too. On the bottom for my boys and at the top for my daughter.
I am so excited to give these to my and my husband's parents.

This was a fun project to do in one evening and a GREAT last minute Christmas gift craft! Feel free to email me with questions or with pictures of your finished projects!


Here is where I linked this project:


Make it Yours @ My Backyard Eden


HookingupwithHoH


Photobucket


Join  us Saturdays at tatertotsandjello.com for the weekend wrap up     party!

Saturday, November 27

More Vendors

Here are a few more vendors being featured at the La La Lola Boutique...December 3rd & 4th!!
Adair Arts


Sashay Jewelry